Clean water is generally defined as water that is free from microbial, chemical and physical contamination. This includes contaminants that present a health risk (e.g. disease-causing bacteria, toxic metals) and those that have no health risk but can make the water unpleasant to drink (e.g. poor taste resulting from high iron levels).
Roughly speaking, water quality can be divided into three domains:
- Microbial contamination refers to the presence of disease-causing (or pathogenic) microbes, which are generally introduced to water sources by contact with faecal material. Common examples include Salmonella Typhi and Vibrio cholerae, which respectively cause typhoid fever and cholera, as well as pathogenic strains of Escherichia coli (E. coli). The World Health Organization (WHO) considers microbial pathogens the highest priority in water treatment given their ability to cause infectious disease.
- Chemical contamination refers to metals, organic compounds and other chemicals that present potential health risks. Water naturally contains many chemicals (sodium and calcium, for example), most of which present no health concerns. A few chemicals, however, do present human health risks, especially for children and when contaminated water is consumed over time. They can stem from both natural sources and human activity like industrial waste disposal and agriculture.
- Physical contamination refers to conditions relating to the water’s physical condition, for example colour, odour, temperature and turbidity (cloudiness resulting from the presence of small particles like pieces of soil). Most of these present no direct health risk, but they can influence other factors (e.g. soil particles in turbid water can shelter bacteria) and sometimes make water unpleasant to drink.
Both the WHO and various national governments publish water quality targets. These take the form of legally mandated standards, unenforced guidelines, or a combination of the two.
The WHO Guidelines for drinking water quality are widely accepted as international targets (especially in the developing world), but you should check to see if other guidelines or standards are applicable to your specific setting. In the United States, for instance, water quality regulations are set by the Environmental Protection Agency.
Step 1: Develop objectives for your testing program
What do you hope to accomplish by testing water quality? Do you want to verify the safety of a drinking water source? Gather more information about known contamination? Test the effectiveness of a treatment technology?
Different answers will inform different testing strategies, since you want to be sure that the data you collect will be helpful in meeting your objectives. For example, testing a well for faecal contamination will involve a different study design than assessing the impact of mining activity on a river.
If possible, consult with a water quality expert for advice on what to test for and testing methods. If not, take the time to think through what information you need and how it can most practically be obtained.
Step 2: Decide what to test for
Limitations on time, funding and access to analytical services makes it impractical to test water samples for every possible type of contamination. Instead, you will need to select the tests most relevant to your program objectives.
Because of the wide variety of potentially-pathogenic microbes in water contaminated by faeces, microbial contamination is generally assessed through the use of indicator organisms, rather than testing for all the different types of microbes. Indicator organisms are types of bacteria that are usually found in the environment only when recently introduced by feces from warm-blooded animals.
Coliform bacteria and E. coli are the most common indicator organisms used. While coliform bacteria are sometimes found naturally, their presence in a water sample is a sign of possible faecal contamination. E. coli, a specific species of coliform bacteria, is generally unable to survive outside the digestive tracts of warm-blooded animals for significant lengths of time and thereby confirms faecal contamination with its presence (note, however, that only some E. coli strains are directly disease-causing in themselves).
Selecting appropriate test targets for chemical contamination can require substantial expertise if pesticides or other complex chemicals are of concern (given their potential to degrade or react in the environment over time), but commercial field tests are available for contaminants like nitrate and arsenic.
Step 3: Decide on testing methods
A variety of testing methods exist for most water quality characteristics, and it is wise to research options related to your specific interests. Be sure to consider the precision and detection limit for each option you consider (i.e. can it accurately differentiate between 40 and 50 parts per million of a contaminant, or just 10 and 100? Can it detect levels above 0.1 parts per million, or only above 1.0?)
In general, a trade-off exists between the expense/effort/expertise involved in a particular testing procedure and the rigor of the resulting data. DIY field kits are available for many tests, for example, but will generally provide results with lower reliability and precision than an established analytical lab.
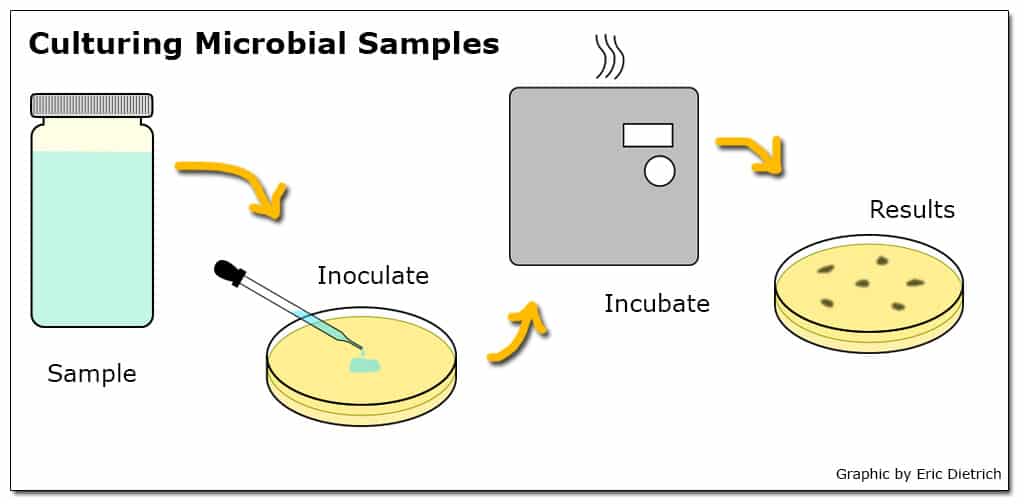
Microbial testing methods generally involve a culturing process where a water sample is combined with a media that provides nutrients for the bacteria of interest to grow while suppressing the growth of others. The media is then incubated so any viable bacteria in the sample multiply to the point where the initial concentration can be estimated.
Information on potential options on microbiology tests can be found through mWater’s Guide to Low-cost Water Microbiology Tests, and equipment for chemical testing can be obtained from manufacturers like Hach (Disclosure: I don’t have personal experience with most of the products listed in either place).
The availability (and quality) of professional laboratories will vary by location, so try to find a certified lab that uses standardized testing methods like those outlined by ASTM. If possible, also request information on the lab’s quality control methods, or testing conducted to verify the accuracy of reported results.
Step 4: Plan your testing program
After identifying appropriate testing techniques, develop them into a larger program plan, including sample collection timing and repetition, team logistics and quality control measures.
Beyond sample collection and analysis, consider whether additional data needs to be collected to meet program objectives. Examples might include information from local health clinics about waterbourne disease incidence or reports from community members about their perception of water quality and related health issues.
Consistent record-keeping over the course of a testing program can be a challenge — perhaps the best approach is developing standardized information sheets to be filled out for each sample collected. In addition to recording GPS coordinates for each sample site, you should take a picture of the source and record information like weather conditions (e.g. rain) that could affect water quality.
Step 5: Conduct Testing
In general, a close reading of the instructions specific to your testing equipment and supplies will be necessary. A few general guidelines, additionally:
Sterilization
Because it is easy to introduce contamination into or between samples (especially with microbial work in an improvised lab situation), maintaining a sterile working environment is essential. Be aware that it is also quite possible to make yourself sick while working with environmental samples! Wear gloves if possible, and sterilize your lab area and equipment both before and after use. If you don’t have access to a designated lab area, foil or plastic sheeting can be used to create a flat, easily-cleaned working surface.
Small glass or metal equipment can be sterilized through contact with an open flame from a gas-burning lighter or stove (other flames can result in soot build-up). Glass, metal and heat-tolerant plastics can also be disinfected by submersion in boiling water for 15 minutes. Note that bleach is generally a poor choice for disinfecting equipment because of its tendency to leave a residue unless equipment is thoroughly rinsed with sterile water (it can be useful for cleaning your work area, however).
Sample collection
Samples should be representative of typical water conditions to the greatest extent possible. When sampling from a well or tap, for instance, you should generally run water for several minutes to flush the system before collection.
A sufficient volume of water should be collected to allow for planned analyses, as well as repetition in the case of a mistake. If using a testing laboratory for analysis, ask about the appropriate volume to collect, and see if they are able to provide sterile containers. In general, at least 100 mL should be collected for microbiological testing.
Once collected, samples should be kept cool (on ice, if possible) and processed within 24 hours to minimize the extent to which bacteria growth or die-off before analysis changes the water quality. Samples held for more than 30 hours after collection should not be tested.
It is generally worth including protocol addressing these considerations in your testing plan to ensure consistency between different rounds of sampling, especially if sampling is to be conducted by multiple people.
Sample Analysis
Again, the specifics here will depend on the nature of your chosen methods, but some general practices are broadly applicable. For example, analyzing control samples with known concentrations of target substances to verify the accuracy of your testing method is generally necessary as a quality control practice. Alternatively, a portion (e.g. 1 in 20) of samples can be tested in duplicate or triplicate to make sure that the results are comparable. With microbial testing for presence/absence, it is common to use blank samples of sterile water as controls.
Additionally, if you divide a sample at any point, shake it vigorously for 10 seconds beforehand. Larger water constituents like sediment and microbes can settle over time, making re-mixing necessary to ensure sub-samples are representative of the whole.
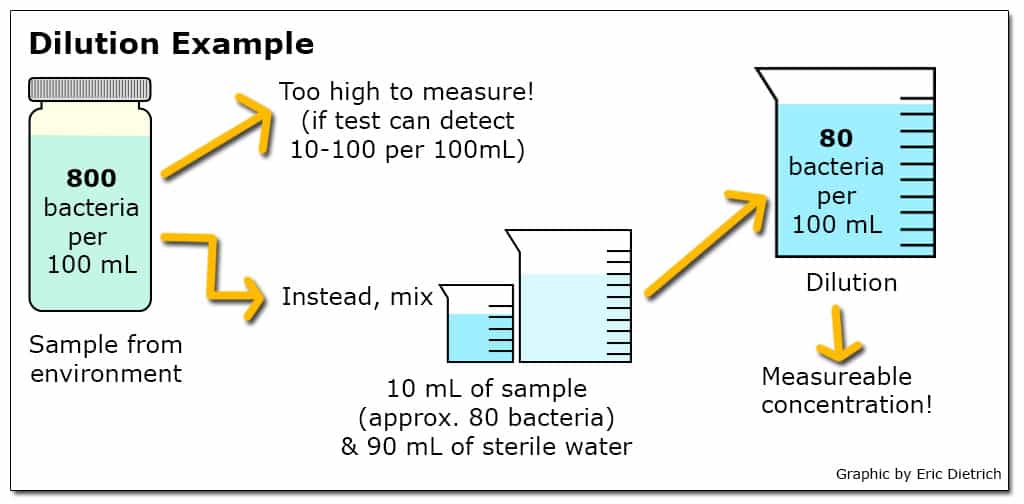
When a particular test has the ability to detect a smaller range of concentrations than is likely to exist in the environment, dilutions are a commonly used approach. For example, if a test to quantify the number of viable E. coli in a sample can reliably detect concentrations between 10 and 100 bacteria in a 100 mL sample but likely environmental concentrations range from 100 to 1000 bacteria per 100 mL, a dilution of 10 mL sample in 90 mL sterile water (a 10-1 dilution) could be employed. Additionally, when environmental concentrations are unknown, testing a range of dilutions simultaneously can increase the chance that at least one returns a usable result.
Step 6: Interpret data & translate to action
Given the number of potential avenues for the introduction of error into the sampling and analysis process, results should be interpreted with caution. Important results (e.g. the discovery of unexpected contamination or the apparent safety of a risky water source) should be verified by replication before action is taken (ideally, your testing plan will account for this).
Specifically, a water source should not be considered safe until it has a consistent history of sustained tests accounting for seasonal changes in conditions (for example, a surface spring producing safe water during the dry season may be contaminated by runoff during the rainy season). If publicizing the results locally, consider your approach carefully given that nuanced findings can be difficult to communicate to an audience without a technical background.